Samuel`s gingerbread birdhouse
- Women`s Corner
- November 5, 2022
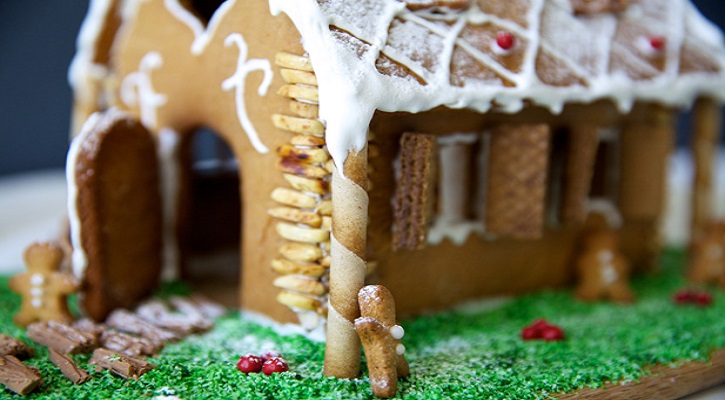
Create this stunning gingerbread birdhouse imagined by Samuel Debenham who won our gingerbread house competition. It's the perfect Christmas centrepiece.
Ingredients:
- 450g unsalted butter
- 360g dark muscovado sugar
- 190g golden syrup
- 1.08kg plain flour
- 3½ tsp bicarbonate of soda
- 2 tbsp ground ginger
Read More: Blueberry and Spinach Superfood Green Smoothie
For the royal icing:
- 500g icing sugar, sieved
- 2 egg whites
- 2 lemons, juiced
For the decorations:
- 150g milk chocolate
- 225g chocolate-coated biscuit sticks
- 1 candy cane
- 10 milk chocolate fingers
- yellow food colouring
Read More: Taiwanese Pineapple Cake
- mini sugar-coated chocolate balls in various colours
- 400g white fondant icing
- 50g each brown, red, yellow, black, and blue fondant icing
- 300g green fondant icing
- black edible writing pen
- edible glue (or use golden syrup)
- 120g sugar-coated chocolate buttons in various colours
Method: Heat the oven to 200C/180C fan/gas 6. For the gingerbread, melt the butter, sugar and syrup in a pan over a low heat. Combine the flour, bicarb and ginger in a large bowl, then stir in the wet ingredients to make a stiff dough. If it’s dry, add a drop of water. Roll out the dough on a sheet of baking parchment to the thickness of two £1 coins. Cut out sections of the house, so you have two side walls, a front and back wall, two roof panels, a base and chimney pieces. Find our template here.
Read More: Crescent Bacon Breakfast Ring
Bake for 15-18 mins, or until firm. To ensure the pieces fit together, remove from the oven three-quarters of the way through baking, then use the templates again to trim the excess. Return to the oven to finish baking, then leave to cool completely.
For the decorations, melt the chocolate in a heatproof bowl over a pan of simmering water or in the microwave in short bursts. Spread some over the front and back panels using a palette knife, starting from the bottom and working up. Attach the biscuit sticks to the chocolate, snapping them to fit, for a log cabin effect.
Leave to set for at least 1 hr. For the perch, snap the candy cane into a 3cm piece at the hooked end, then stick to the front panel with more chocolate. For extra support, cut a chocolate finger to fit and stick upright beneath the candy cane to look like a wooden post. Leave to set overnight, propped against a can.
Read More: Pineapple Turmeric Smoothie
For the royal icing, beat the sugar, egg whites and lemon juice together in the bowl of a stand mixer or using an electric whisk until stiff and smooth. Add a little water to loosen, but don’t make it runny. Cover the bowl with a damp tea towel so it doesn’t dry out.
Next, decorate the two side walls. Colour 2 tbsp of the royal icing yellow using food colouring, then loosen with a drop of water. Spoon into a piping bag fitted with a small round nozzle. Loosen another 2 tbsp royal icing with a drop of water and spoon into a second piping bag, then snip off the end. Pipe three half-loops across the tops of the side panels using the plain icing to create a string, then stick on sugar-coated chocolate balls for lights, alternating the colours. Pipe windows and panes using the yellow icing, then pipe a line beneath the windows and stick on a piece of biscuit stick for a ledge. Leave to dry for 30 mins.
Read More: Cherry Coconut Scones
Spoon another 100g royal icing into a piping bag and snip off a large 5mm hole. Put the base panel on a cake stand or plate. Pipe a line 2.5cm in from the back edge and attach the back panel. Repeat with the other wall panels. Gently push 25g white fondant icing into each corner at the base for extra support, then pipe more royal icing along the inside joins from top to bottom. Place mugs around the house so the handles press into each wall for support. Leave to set for 1-2 hrs.
Make a robin using brown, red and yellow fondant, rolling small balls of white fondant for the eyes and drawing on pupils using the pen. Make Santa’s legs with red and black fondant, and a snowman using some white fondant (attach biscuit stick arms, then decorate with small pieces of black and red fondant for mittens), presents in various colours and white fondant snowballs. Spoon another 2 tbsp royal icing into a small piping bag fitted with a small star nozzle.
Use to pipe a hat brim and pom-pom on the robin, then pipe trim on the hem of Santa’s trousers. For the wreath, roll out 100g green fondant and stamp out a 6cm circle using a biscuit cutter, then stamp a 2cm circle from the middle. Snip around the edge using scissors for a pine needle effect, then roll small red fondant balls and stick to the wreath.
Read More: Apricot Coconut Scones
Once the house is dry, attach the roof panels with more royal icing. The angle is steep, so you may need to hold these in place for a few minutes while they set. Leave to dry completely, ideally overnight.
Stick the four chimney pieces together with royal icing in the same way you made the walls. Leave to set for 1 hr. Re-melt the chocolate and paint some onto the chimney. Attach some biscuit sticks, breaking to fit until the chimney is covered, then attach the chimney to the house using more royal icing. Leave to set for 30 mins. Roll out 200g green fondant and cut out 100 small circles using a piping nozzle. Brush edible glue over the roof and attach the green circles. Use more glue to attach the chocolate buttons on top.
Read More: Raspberry Filled Cookie Bars
Fill a piping bag with more royal icing, snip off a 5mm hole and pipe ‘snow’ over the roof and window ledges, pulling away along the roof edge and chimney to create icicles. Affix the wreath, robin, snowman, Santa’s legs, presents and snowballs using royal icing. Leave to set for 1 hr. Will keep on display for up to two weeks.
This recipe is taken from https://www.bbcgoodfood.com/recipes/

